
To make papercraft, print a template at actual size on light cardstock, score every fold line, cut the pieces out, pre-fold them, then glue the tabs one at a time in the order the parts are numbered. That is the whole method. Everything else in this guide is the detail that makes it work: which paper, tools and glue to use, how to read the lines on a template, how to print so the pieces line up, and the small techniques that separate a crisp model from a crumpled one.
We make Unfold: Papercraft Studio, an app with a library of printable papercraft templates for iPhone and iPad, so the examples and numbers here come from real templates. When we looked across all 114 templates in the Unfold library in November 2026, a few patterns stood out, starting with how long a model really takes. You will find them in the section on reading a template.
How to make papercraft: the short version
- Choose a Beginner template with ten pieces or fewer for your first model.
- Print it at 100% (“actual size”) on matte cardstock of about 160 to 220 gsm, on the paper size the template lists.
- Score every fold line with an empty ballpoint pen run along a metal ruler, while the sheet is still flat.
- Cut out the pieces, keeping the glue tabs attached.
- Pre-fold every line: mountain folds away from you, valley folds toward you.
- Glue one tab at a time, in the order of the part and edge numbers, with a thin line of white craft glue.
- Close each shape last, join the finished sections, and let the model dry before you move it.
In this guide:
- What papercraft is, and how it differs from origami
- Papercraft tools and materials
- How to read a papercraft template
- How to print a template so the pieces line up
- How to make papercraft, step by step
- Techniques for a cleaner, sturdier model
- Three real builds, from one evening to a weekend
- Common papercraft mistakes and how to fix them
- Where to find templates, and how to make your own
- Papercraft FAQ
What papercraft is, and how it differs from origami
Papercraft, also called paper modeling, card modeling or pepakura, is building three-dimensional models out of flat, printed paper pieces. A designer takes a 3D shape and unfolds it into flat parts. That set of parts is the template. You print it, cut the parts out, fold them along printed lines and join them with small flaps called glue tabs.
It is easy to confuse with two other paper arts:
| Origami | Kirigami | Papercraft | |
|---|---|---|---|
| Starting point | One uncut sheet | One sheet | A printed template of many parts |
| Cutting | No | Yes | Yes |
| Glue | No | Rarely | Yes, on tabs |
| Result | Folded figure | Pop-ups, cut patterns | A solid 3D model with printed color and texture |
If you searched for “how to make paper crafts” and found greeting cards and paper flowers, that is general paper crafting. This guide is about 3D papercraft models: animals, buildings, vehicles and characters you can put on a shelf.
Papercraft tools and materials
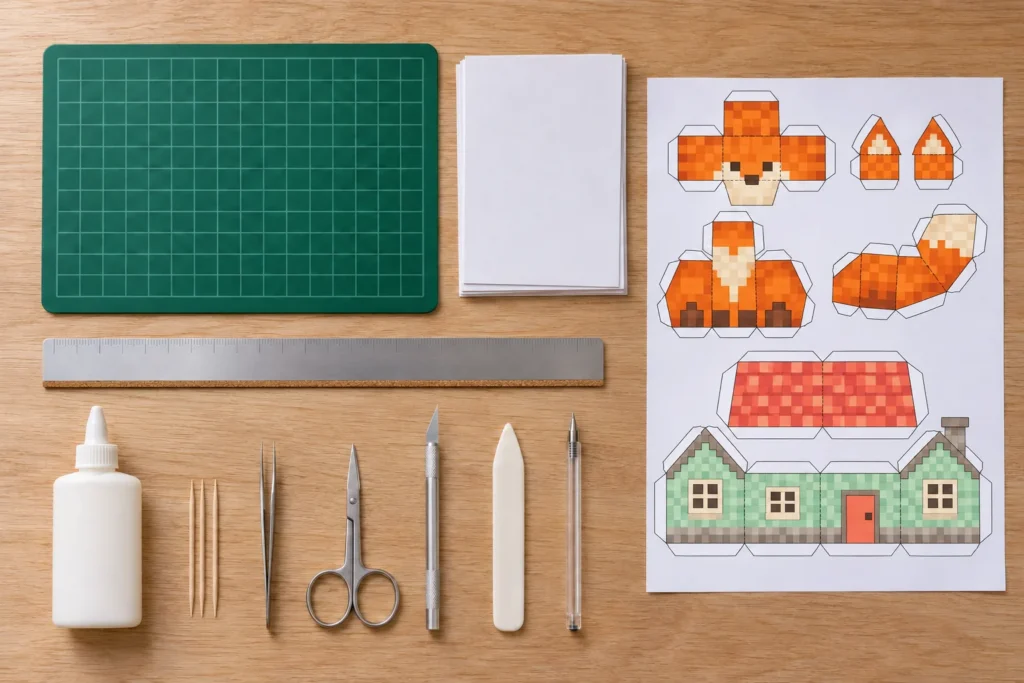
You can start with less than you think: paper, small scissors, something to score with, and glue. Everything else makes the work faster and cleaner, and you can add it as you go.
Paper: which weight to use
Paper weight is the single biggest choice you make. Too thin, and big flat faces bow and corners crush. Too thick, and small parts refuse to fold and seams gape. Weight is given in grams per square meter (gsm) or, in the US, in pounds; cardstock is usually sold in “lb cover”.
| Paper | Weight | Best for |
|---|---|---|
| Copy paper | 75–90 gsm (20–24 lb bond) | Test prints and practice builds only |
| Light cardstock | 160–200 gsm (about 60–74 lb cover) | Most models: animals, figures, small and curved parts |
| Medium cardstock | 200–250 gsm (about 74–92 lb cover) | Buildings, vehicles and boxes with big flat faces |
| Heavy cardstock | 250–300 gsm (about 92–110 lb cover) | Bases, stands and structural parts; hard to fold when small |
- Choose matte, not glossy. Glossy and photo paper crack along folds and glue slides on their coating. Matte cardstock takes both ink and glue well.
- Use the paper size the template lists. Templates are laid out for a specific sheet: A4, US Letter or A3. In the Unfold library, 101 of the 114 templates print on Letter and 13 need A3.
- Check what your printer can feed. Many home printers take cardstock only through a rear or manual feed tray, and each has a maximum weight. The printer’s manual lists it.
- Mind the grain. Paper fibers run in one direction. Folds along the grain stay clean; folds across it can crack on heavy card. If one direction of fold keeps cracking, the grain runs across it: score a little deeper or drop to a lighter card.
Cutting tools
- Small, sharp scissors with pointed tips handle Beginner models on their own, and they are the better tool for curves.
- A craft knife with a fine pointed blade cuts straight edges, inside corners and openings that scissors can’t reach. Change the blade as soon as it drags: a dull blade tears fibers, and you press harder, which is when it slips.
- A self-healing cutting mat protects the table and keeps the blade sharp longer. Never use a knife without one.
- A metal ruler, ideally with a cork back so it doesn’t slide. A knife shaves plastic rulers and drifts off the line.
Scoring tools
Scoring means pressing a groove into the paper along a fold line before you fold it. On cardstock it is the difference between sharp, straight edges and soft, wandering ones. An empty ballpoint pen is the classic free tool. An embossing stylus, the back of a craft knife blade or a dried-out fine-liner work too. Press hard enough to leave a groove you can feel with a fingertip, not so hard that the paper splits or the print cracks. A bone folder is a flat tool for pressing folds flat afterwards; it is a nice upgrade, not a requirement.
Glue
- White PVA craft glue, especially the thicker “tacky” kind, is the standard. It grabs in a few seconds, leaves you time to adjust a seam, and dries clear.
- Glue sticks are fine for laminating flat sheets together, but too weak for small tabs that are under tension. Tabs glued with a stick tend to spring open later.
- Super glue is a poor fit: it sets instantly with no time to adjust, turns brittle, and can leave a white haze on the paper around the seam.
- Double-sided tape is handy for flat bases and laminated parts, but awkward on tiny tabs.
Put a small pool of glue on a scrap of card and pick it up with a toothpick. You will use far less than squeezing from the bottle, and excess glue is the main cause of wrinkled, warped parts.
A starter kit
| Essential | Worth adding |
|---|---|
| Matte cardstock, about 180–200 gsm | Craft knife and self-healing cutting mat |
| Small pointed scissors | Metal ruler with a cork back |
| An empty ballpoint pen for scoring | Bone folder |
| White PVA craft glue and toothpicks | Fine-point tweezers |
| A printer that feeds your cardstock | Colored pencils or markers for the edges |
How to read a papercraft template
A template is a set of instructions printed in lines and numbers. Two minutes spent reading it before you cut saves twenty minutes of unpicking later.
Cut lines and fold lines
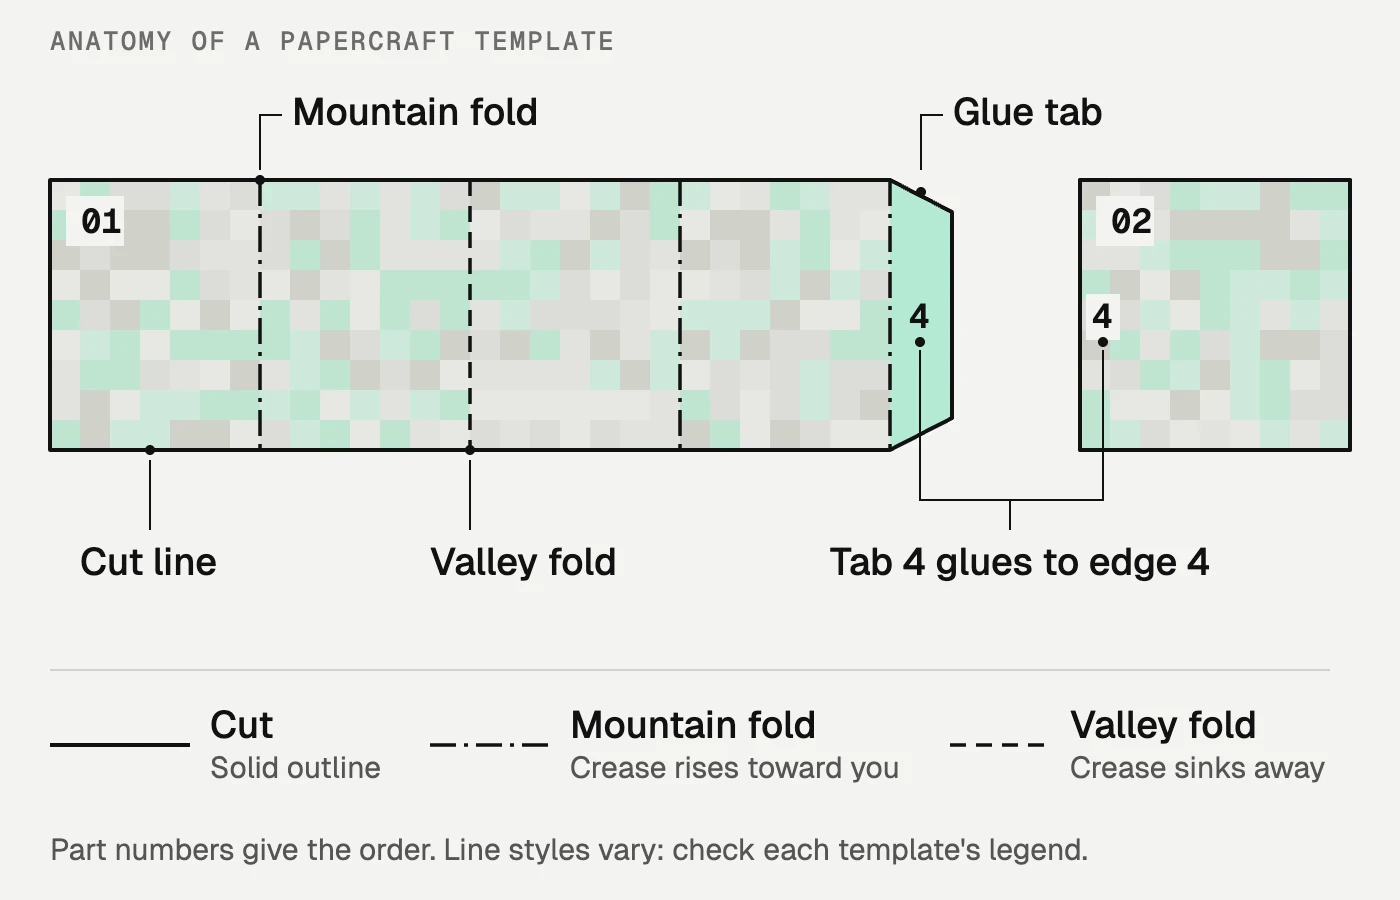
- Cut line: the solid outline of each part.
- Mountain fold: the paper folds away from you, so the crease rises toward you like a ridge. It is most often drawn as a dash-dot line.
- Valley fold: the paper folds toward you, so the crease sinks away like a valley. It is most often drawn as a dashed line.
These conventions vary. Some designers use colors, some print fold lines faintly or not at all on the outside of the model so they don’t show. Always check the template’s own legend or instructions before you score.
Glue tabs and edge numbers
Glue tabs are the small trapezoid flaps on the edges of parts. Each one carries a number, and the same number sits on the edge it joins, often on another part. “Tab 4 to edge 4” means the tab folds behind and is glued under that edge, so the tab ends up hidden inside the model. Untabbed edges with a number are the ones that receive a tab.
Part numbers and assembly order
Parts are numbered in the order the designer intends you to build them. Follow it. Building out of order is how you end up with a seam you can no longer reach. Many models are built as separate sections, such as a body, a head and a base, that are joined at the end.
What difficulty, pieces and build time really tell you
Most templates list a difficulty, a piece count, a page count and an estimated build time. Here is how those numbers look across the 114 templates in the Unfold library, using the build time each template lists.
| Difficulty | Templates | Median pieces | Median pages | Median build time | Build time range |
|---|---|---|---|---|---|
| Beginner | 19 | 10 | 2 | 1 h 15 min | 10 min to 2 h 30 min |
| Intermediate | 61 | 13 | 4 | 2 h 30 min | 30 min to 5 h |
| Advanced | 34 | 33 | 9 | 4 h 50 min | 2 h 30 min to 17 h 30 min |
Three things follow from the numbers:
- Budget about 8 to 11 minutes per piece. The median is about 8 minutes per piece for Beginner models and 10 to 11 for Intermediate and Advanced ones. A 20-piece model is roughly a three-hour build.
- Piece count predicts time better than difficulty does. The difficulty bands overlap: the quickest Advanced templates take 2 h 30 min, while some Intermediate ones take 5 hours. Build time rose almost in step with the number of pieces across the library, so count the pieces before you judge a template by its label.
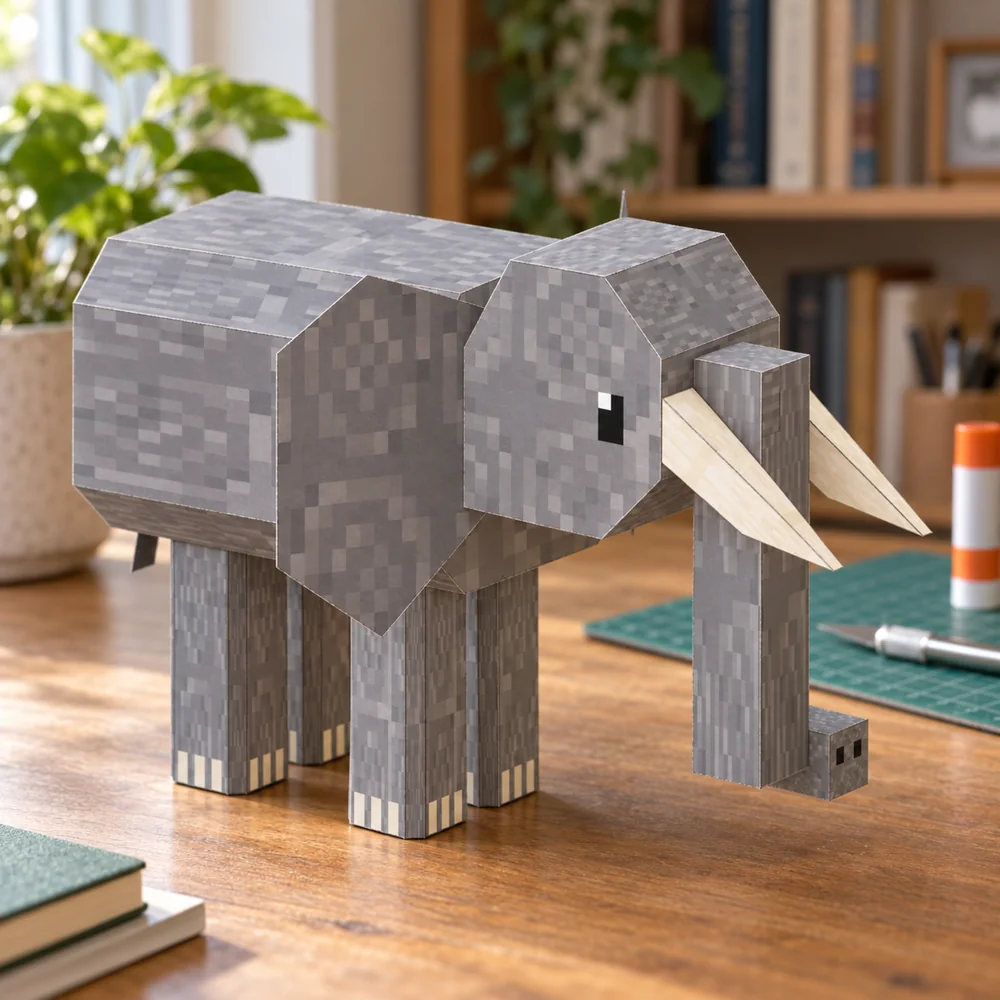
- Pages tell you the size, and size adds time. The Elephant has only 13 pieces but prints on 17 pages and takes 5 hours: its parts are large, so every cut and seam is long. Only 7 of the 114 templates take under an hour, and 15 take more than 5.
How to print a template so the pieces line up
Many problems that look like building mistakes are printing mistakes. If one page prints at 97% and the next at 100%, no amount of careful gluing will make their seams meet.
- Load the paper size the template lists, and use the same paper for every page of the model.
- Print at 100% or “actual size”, with “fit to page” turned off. Scaling is the most common reason pieces don’t line up, and many print dialogs turn it on by default.
- Print one test page on plain paper first. Check that no edge is cropped and that the printout matches the template’s layout before you feed in cardstock.
- Use a high-quality print setting for the final print. Textures and thin lines stay sharp, and fold lines are easier to follow.
- Let the ink dry before scoring or gluing. Fresh inkjet ink smears under a scoring tool, and damp glue can make it run.
Laser printers give crisp, waterproof prints, but toner can crack along sharp folds on heavy card; scoring first helps. Inkjet prints fold cleanly but are more sensitive to glue and moisture. In Unfold, templates print from inside the app through AirPrint, Apple’s wireless printing system, so the same rules apply: choose your paper size and keep the scale at 100%. Our guide to the Unfold app covers that step in detail.
How to make papercraft, step by step
Every template is different, and its own instructions come first. But this order of work applies to nearly every papercraft model, and following it avoids most beginner mistakes.
1. Study the template and plan the order
Look at a photo of the finished model, then at the printed sheets. Find part 1, work out which parts make which section, and check which folds are mountains and which are valleys. If a part number will be cut away or hidden, write it lightly in pencil on the back of the part before you cut. Small loose parts with no number are the ones that get lost or mixed up.
2. Score every fold line while the sheet is flat
Scoring a whole sheet is far easier and more accurate than scoring a small cut-out part that slides around under the ruler. Lay the ruler along each fold line and run your scoring tool down it once, with firm, even pressure.
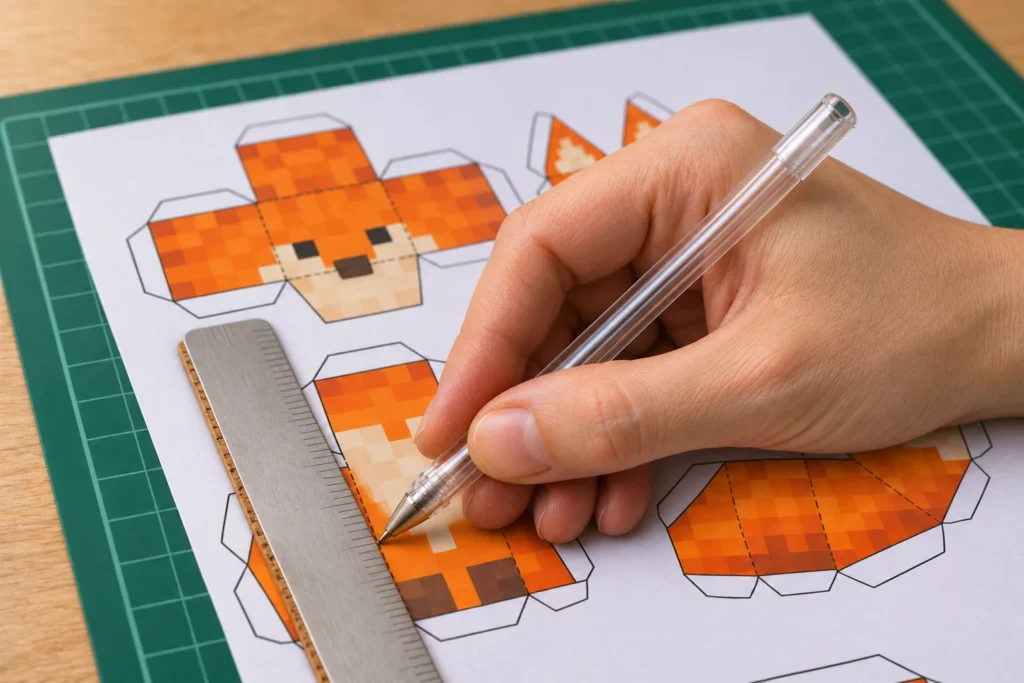
Which side to score on? The simplest method is to score on the printed side, along the printed lines you can see. On thicker card, many builders get crisper mountain folds by scoring from the back, so the groove sits on the inside of the fold: prick each end of the fold line with a pin, turn the sheet over, and score between the two holes. Try both on a scrap of the same card and keep whichever folds cleaner.
3. Cut out the parts
- Cut openings first. Windows, slots and holes inside a part are easier to cut while the part is still attached to the sheet and supported.
- Cut on the line or just inside it, so no white border shows on the finished model.
- Use the knife for straight edges and inside corners, scissors for curves. With scissors, turn the paper rather than the scissors to keep curves smooth.
- Keep every glue tab. They look like waste, but they are what holds the model together.
- Cut one section at a time and keep its parts together in a tray or envelope, so a 40-piece model doesn’t become a pile of loose shapes.
4. Pre-fold every line
Before any glue comes out, fold each part along all its scored lines in the right direction: mountain folds away from you, valley folds toward you. Pinch each fold sharp between finger and thumb or run a bone folder along it, then let the part relax open. This dry fold shows you the part’s 3D shape, and the folds snap into place when you glue.
5. Glue one tab at a time, in number order
Put a thin line of glue on one tab, line its edge up with the matching numbered edge from one end, and press the seam together for 10 to 20 seconds until it grips. Then move to the next tab. Gluing several tabs at once feels faster, but the first one shifts while you wrestle the third. Wipe any glue that squeezes out right away with a dry cotton swab, before it skins over.
6. Close each shape last
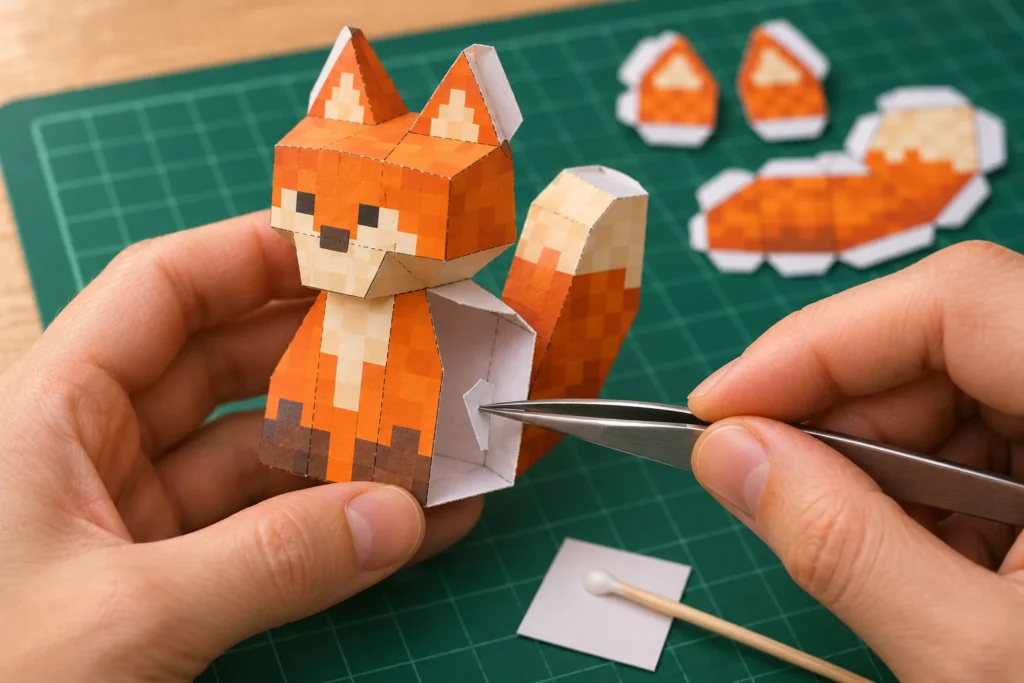
The hardest seam on any closed shape is the last one, because you can no longer reach inside to press it. Plan for it. Glue every seam you can reach from both sides first, and leave the closing edge for the end. Then put glue on the final tabs, close the shape, and press each tab from the outside with a fingertip, the flat of a toothpick, or tweezers pushed through the remaining gap. Some builders leave the very last tab unscored, so the closing edge stays smooth and rigid enough to press against.
7. Join the sections and let it dry
Dry-fit each finished section before you glue it to the next, and let each one set first so its seams don’t pop open while you handle it. Build the base early if the model has one: everything else lines up against it. For a tall model, drop a few coins inside the base before you close it to lower its center of gravity. When the model is complete, leave it alone for a while before it goes on the shelf.
Techniques for a cleaner, sturdier model
Curved and round parts
Paper wants to stay flat, so give curved parts their shape before gluing: roll them around a pen, a pencil or a wooden dowel, gently, printed side out. Then glue a curved seam a few tabs at a time rather than all at once, holding each short stretch until it sets.
Hiding white edges
The cut edge of printed card is white, and on a dark model it shows as a thin line along every seam. Run a marker, a colored pencil or a watercolor pencil along the edges before assembly, in a color close to the print. Test on a scrap first: some markers bleed into the paper.
Long seams
On a long edge, tack both ends and the middle first, then glue the stretches between them. Starting at one end and working along tends to drift, so the seam is a few millimeters out by the time you reach the far end.
Tabs that collide or show
Where two tabs meet at a corner inside the model, they can push against each other and stop the corner closing. Trim the corners of the tabs at an angle. If a tab peeks out of a seam on the finished model, trim it narrower; it only needs to be wide enough to hold glue.
Making a model sturdier
- Laminate thin parts such as wings, sails or stands: glue the printed sheet to a second card, such as a cereal box, before you cut.
- Add hidden braces from scrap card inside large flat faces that would otherwise bow.
- Seal the finished model with a light coat of clear matte spray varnish if it will be handled. Test on a scrap print first, because some coatings make inkjet ink run or change color.
Three real builds, from one evening to a weekend
Here is how the steps above play out on three templates from the Unfold library, with the figures each template lists.
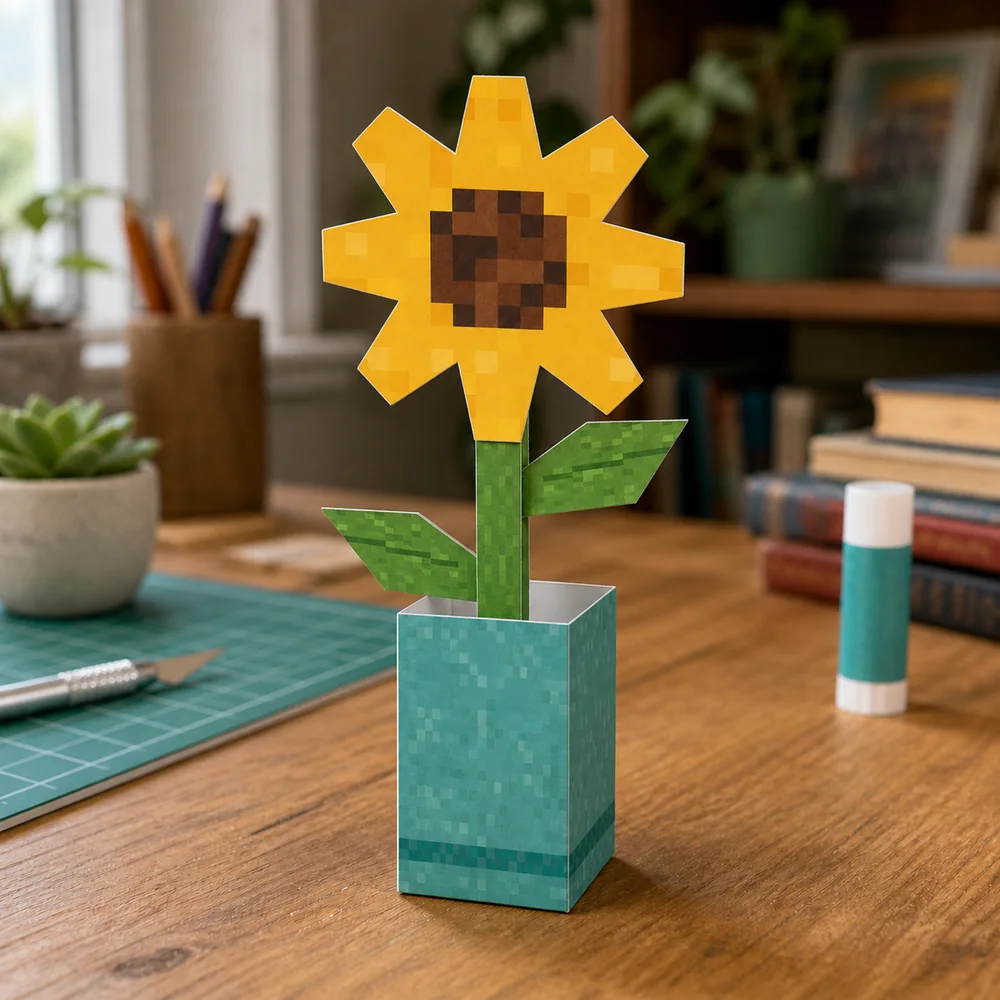
- One evening: the Sunflower. Beginner, 5 pieces on one A3 page, about 30 minutes. Its job is to teach you your materials: how your card scores, how fast your glue grabs, and how your printer handles cardstock. If you only have Letter or A4 paper, the Halloween Ghost (2 pieces, one Letter page, about 20 minutes) does the same job.
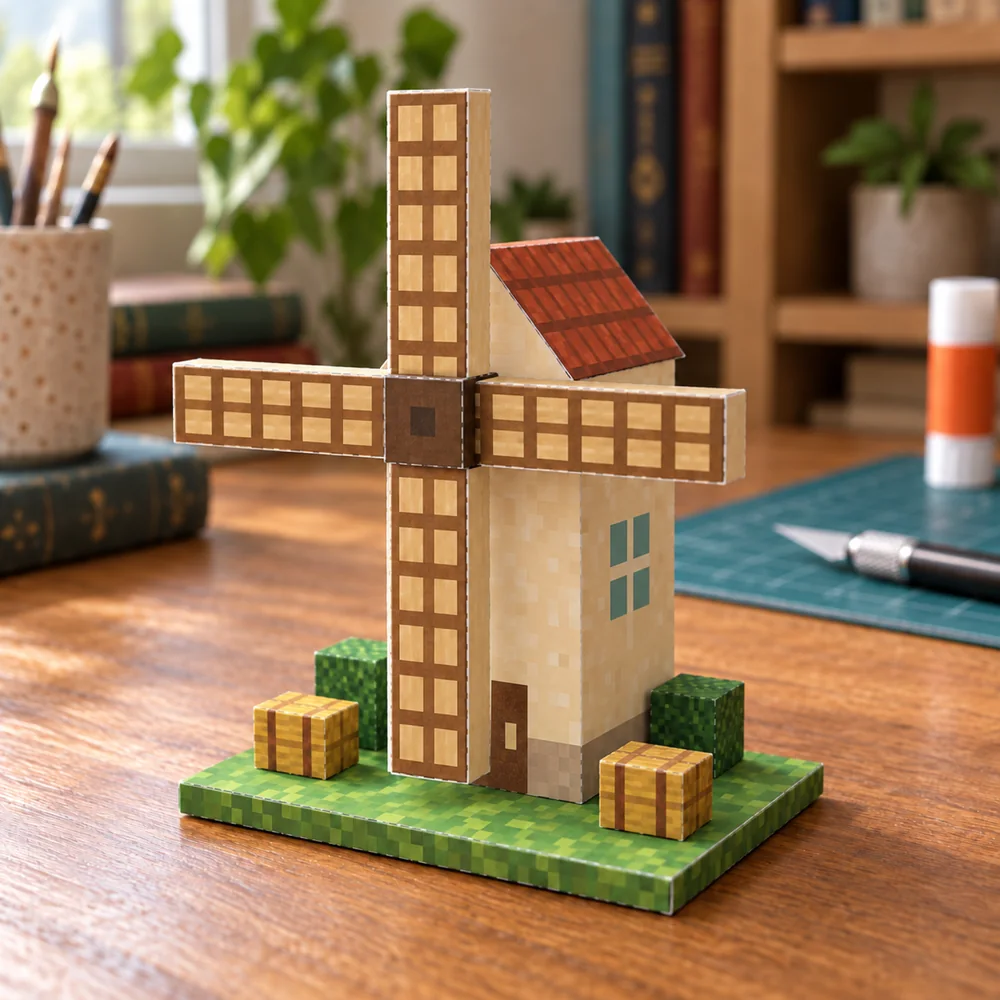
- An afternoon: the Farm Windmill. Intermediate, 12 pieces on one Letter page, about 2 hours. A dozen parts is a good first test of keeping parts in order and sections lined up, and the whole model still fits on a single page.
- A weekend: the Elephant. Intermediate, 13 pieces over 17 pages, about 5 hours. Few pieces, but large ones, so every cut and seam is long: a lesson in tacking seams before gluing them. Spread it over two sittings and store finished sections flat in between. After that, an Advanced model such as the Capybara (38 pieces, 13 pages, about 7 h 30 min) is within reach, and The White House (72 pieces, 33 pages, about 17 h 30 min) is the largest model in the library.
Common papercraft mistakes and how to fix them
| Problem | Likely cause | Fix |
|---|---|---|
| Seams don’t meet; parts are slightly the wrong size | A page printed with scaling or “fit to page” | Reprint the affected pages at 100%, all on the same paper |
| Folds are soft, wavy or off the line | Card wasn’t scored, or was scored after cutting | Score on the flat sheet along a ruler; reprint if the part is already crumpled |
| Folds crack, showing white | Card too heavy, folding across the grain, or toner on a sharp fold | Score before folding, or use a lighter card |
| Wrinkled, warped faces | Too much glue | Use a thin line from a toothpick; let parts dry flat |
| Seams pop open later | Glue stick, or seams handled before they set | Re-glue with PVA and hold until it grips |
| A tab tears off | Handling or a dull blade | Glue a thin strip of scrap card behind the seam as a new tab |
| A part is miscut or lost | It happens to everyone | Reprint just that page; it is why you keep spare sheets |
| The last seam won’t close neatly | Shape closed in the wrong order | Next time, leave the closing edge for last; for now, press from outside with tweezers through a gap |
The mistake behind most abandoned models isn’t on that list: starting with the most impressive template. A 70-piece landmark as a first build is how papercraft ends up in a drawer. Build two or three short models first; by the third you will choose by build time rather than by fear of the instructions.
Where to find templates, and how to make your own
- Curated libraries. The Unfold papercraft library shows every template on the web with its photo, difficulty, pieces, pages, build time and paper size, sorted into collections such as animals, vehicles, landmarks and Christmas. Browsing and saving templates in the app is free; printing comes with a membership, a subscription with a free trial.
- Free templates from printer makers. Canon Creative Park publishes free papercraft templates to print at home.
- Your own designs. Unfolding software turns a 3D model into a printable template: Pepakura Designer is the best known, and Blender has a free Export Paper Model add-on. Start from a low-poly model: every face becomes paper, so fewer, larger faces make a buildable template.
Papercraft FAQ
What do I need to start papercraft?
A printed template, matte cardstock, small sharp scissors, an empty ballpoint pen for scoring, and white PVA craft glue with a toothpick to apply it. A craft knife, cutting mat, metal ruler and tweezers make the work cleaner, but you don’t need them for a first Beginner model.
What is the best paper for papercraft?
Matte cardstock of about 160 to 220 gsm (roughly 60 to 80 lb cover) suits most models. Use the lighter end for small and curved parts and the heavier end for buildings and bases. Always use the paper size the template lists.
Can I use regular printer paper for papercraft?
Yes, for practice and test prints, and for very small models. Copy paper (75–90 gsm) is cheap and folds easily, but large faces bow inward and corners crush, so use cardstock for a model you want to keep.
What glue is best for papercraft?
A thick white PVA craft glue, often sold as “tacky glue”. It grabs in seconds, leaves time to adjust a seam and dries clear. Avoid glue sticks for tabs, which spring open later, and super glue, which sets too fast and can leave a white haze.
Should I score on the front or the back?
Scoring on the printed front, along the visible lines, is simplest and works well on light cardstock. On heavier card, scoring mountain folds from the back gives a crisper fold; mark the ends of the line with pinpricks so you can find it on the blank side.
What is the difference between a mountain fold and a valley fold?
Looking at the printed side, a mountain fold bends the paper away from you so the crease rises like a ridge; a valley fold bends it toward you so the crease sinks. Mountain folds are usually drawn as dash-dot lines and valley folds as dashed lines, but check the template’s legend.
Why don’t my papercraft pieces line up?
Almost always print scaling. Print every page at 100% or “actual size” with “fit to page” off, on the same paper size. If the print is right, check that each part was cut on the line and that every fold was scored and pre-folded.
How long does a papercraft model take?
Budget about 8 to 11 minutes per piece. Across the Unfold library, Beginner models take a median of 1 h 15 min, Intermediate 2 h 30 min and Advanced about 4 h 50 min, from 10 minutes for the smallest model to 17 h 30 min for the largest. Your first models will take longer than the listed time.
Is papercraft hard for beginners?
No, if you start small. A Beginner template with ten pieces or fewer takes an evening and teaches every core skill: scoring, cutting, folding and gluing tabs. Difficulty comes from piece count, small parts and curves, so step up gradually.
How do I make papercraft stronger?
Use a heavier card for structural parts, laminate thin parts onto a second card before cutting, add scrap-card braces inside large faces, weight the base, and finish with a light coat of clear matte varnish after testing it on a scrap print.
How do I hide the white edges on papercraft?
Color the cut edges with a marker or colored pencil that matches the print, before you glue. Cutting exactly on the line, or just inside it, also keeps white borders off the finished model.
Is papercraft suitable for kids?
Yes, with an adult nearby. Children can choose the model, fold and press tabs, and cut simple outlines with child-safe scissors, while an adult handles any craft knife. Short Beginner models work best, and finished paper models are decorations, not toys, so keep small parts away from young children and pets.
What is the difference between papercraft and origami?
Origami folds a single uncut sheet without glue. Papercraft builds a model from many printed parts that are cut out, scored, folded and glued together with tabs, so it can reproduce shapes and printed textures origami can’t.
Make your first model this week
Pick a short Beginner template, print a test page at actual size, score before you cut, and glue one tab at a time. Nothing beats a finished model on your desk for learning what to do differently on the next one.
- Browse easy papercraft templates for beginners
- Browse Christmas papercraft templates
- Get Unfold: Papercraft Studio on the App Store
- Get help from Unfold support
Unfold is made by asquared, an independent studio in Istanbul making apps for iPhone and iPad.